Product Photography is more of Commercial Photography, which is about accurately but attractively representing a product. The principal application of product photography is in product catalogues & brochures, with a proportion of product images also being used in advertising
- Educate your self about the Product, its size, scale & use
- Tell the Product Story Visually
- Product Photography is all about proper lighting – make use of DIY & Gradient Reflectors, Polished wood Planks or Light Painting to enhance the product. In nutshell get the Right Light – Hard or Soft Light
- Focus on your background details to compliment your product. Incorporate an Interesting & catchy Background.
- Use White & Black bounce Cards made out of foam board to have good bounce as it’s rigid – White & Black both Works. Select the velvet based on your product specs
- Have a stable square Table & white mat sheet to be used as seamless white background and to deflect/soften the window light. You can use Cube Lite Box/Shell as well
- Keep Knife & Tape to clamp & secure the boards/background
- Set up your Camera, Table & Sweep appropriately for the shoot
- Select the shooting place near the window so that you can control the flow of direct sunlight
- Set your product in the middle of the surface of table. You can hang your Product as well. Keep the Sense of Scale in mind. Bloom like a “Flower”
- DSLR Camera with Prime/Macro Lens is recommended for the product Shoot. Don’t use wide angle lens for Product Photography
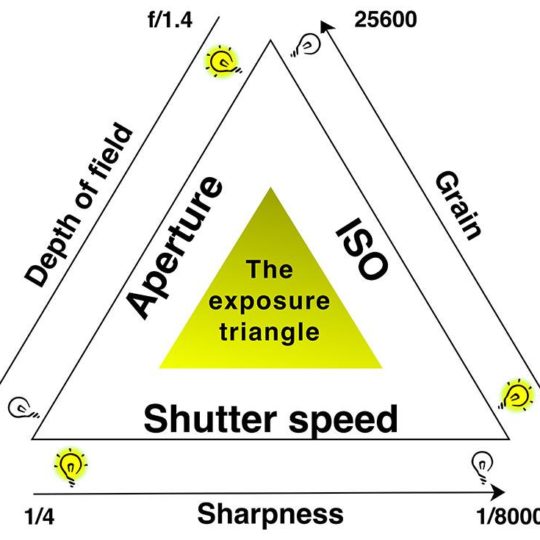
- Use aperture range from f/8 to f/16 to have maximum depth of field. Use Shutter Speed range of 1/50th – 1/125th of Second
- Tripod is necessary to have firmness & stability. Use remote cable release button for your camera
- Set your White Balance to Auto mode
- Set the right Exposure (use light meter) & colour balance
- Turn off you flash setting to off mode
- Stay Natural to easily relate with target audience
- Shoot images in RAW format to have more for post processing table
- Set your ISO to 100 to control noise distortion
- Shoot images at the same height with straight angle as of your product. However you may vary the height depending upon product details highlight
- Frame your subject carefully, Place product/subject above a Reflected Surface
- Put your product into three quarter angle to look good & attractive the straight look is boring
- Use Unique stand to add an appeal to the photo, take it to another level
- Try some Macro /Close up Shots
- Show the product in Weird use to draw attention
- Add Personality, if you can
- Use Photo Manipulation
- Do experiment, move around the product for multiple angles close ups. Show more not less
- Editing is important. Get your picture retouched on post processing table by selecting the Image Size, Crop the image, re touch Image Format, Quality, Colour Space, Contrast, Brightness or Darkness, Re-Sizing & Resolution
- Product Photography is Challenging and quite interesting. Get going with having a great fun with product photography Shoots/Post Processing

Recent Comments